
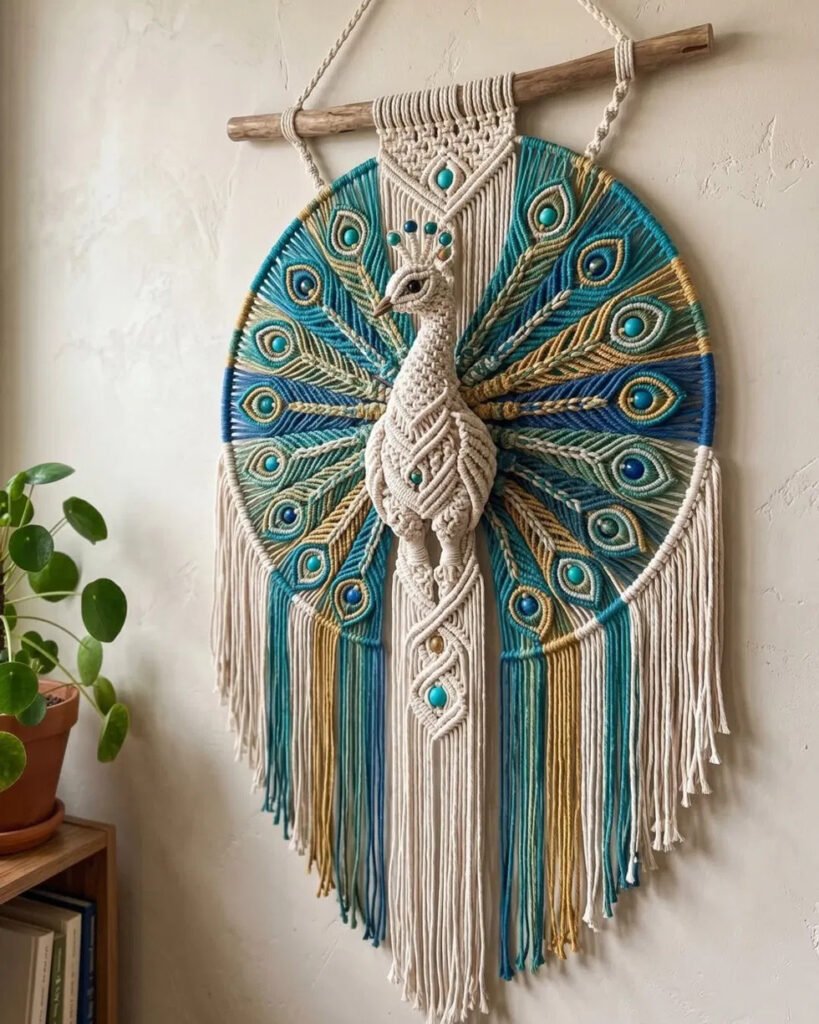
Finished peacock wall hanging macramé pattern with beaded feather rays on driftwood and hoop

Peacock

Skill levelAdvancedFinished size20 in wide x 38 in long (51 x 97 cm)Build time18-24 hours / 6-8 evening sessions

This peacock wall hanging macramé pattern brings a stunning three-dimensional bird to life, complete with radial feather rays and beaded eyes. Designed for advanced crafters, it transforms single-twist cotton in five vibrant colors—cream, teal, blue, gold, and sage—into a showpiece that measures 20 inches wide by 38 inches long.

Create a Peacock Wall Hanging Macramé Pattern Masterpiece

Estimated build time is 18–24 hours, spread comfortably over 6–8 evening sessions. You’ll sculpt the body using vertical clove hitches over a padded core, then radiate fourteen feather rays from a metal hoop hub. Each ray features a beaded Berry Knot eye encircled by diagonal clove-hitch halos, and color-blocked fringe flows below.

What’s Included in Your Download

Your instant-download package includes a fully illustrated step-by-step PDF with cord-cutting charts, knot diagrams, and three technique deep-dives. In addition, a printable quick-reference card keeps your materials list and build order at your fingertips. Therefore, you can tackle vertical clove hitch shaping, Berry Knot medallions, and radial assembly with confidence.

Perfect for intermediate-to-advanced makers seeking a dimensional fiber-art challenge, this peacock pattern suits boho gallery walls and statement entryways. Because every ray and feather eye is diagrammed, you’ll master new techniques while creating heirloom-quality wall art. Meanwhile, troubleshooting tips and bead-placement maps ensure your peacock displays beautifully every time.

Materials at a glance

  • 3 mm single-twist cotton: cream ~160 yd, teal ~48 yd, blue ~34 yd, gold ~34 yd, sage ~22 yd
  • Driftwood branch 24-28 in
  • 16 in metal hoop
  • 2 in hidden hub ring
  • Beads: 10 mm teal (8), blue (6); 8 mm amber (5), sage (3)
  • Board, T-pins, shears, 3.5 mm crochet hook, fabric stiffener, wire brush

Build order

  1. Prep: wrap hoop arc, tie hangers, pin board
  2. Mounting panel: LHK Group A, SK mesh, lash to hoop
  3. Feather rays (14): LHK Groups C-F, DCH spines, Berry Knot eyes, taper
  4. Hub: lash ray tips to 2 in ring
  5. Sculpted body: VCH over padding, stitch over hub
  6. Head & crown: GW neck, bead crown stems, wrap beak
  7. Tail drop: HKS spiral, picot leaf with bead
  8. Fringe & finishing: RYA Group G, color-block, trim, brush, stiffen

Cord cutting reference

  • H — 2 × 2.5 yd (hangers, cream)
  • A — 12 × 3.5 yd (mounting panel, cream)
  • B — 16 × 2.5 yd (body warps, cream)
  • B2 — 10 × 3 yd (padding & VCH weavers, cream)
  • C — 20 × 2 yd (feather rays, teal)
  • D — 16 × 2 yd (feather rays, blue)
  • E — 12 × 2 yd (feather rays, gold)
  • F — 8 × 2 yd (feather rays, sage)
  • G — 28 × 1.5 yd (fringe RYA, mixed colors)
  • X — 14 × 1.5 yd (halos, wraps, lashing, tail, mixed)

Knot abbreviations

  • LHK = Lark's Head Knot
  • SK = Square Knot
  • HKS = Half Knot Spiral
  • HCH = Horizontal Clove Hitch
  • DCH = Diagonal Clove Hitch
  • VCH = Vertical Clove Hitch
  • BK = Berry Knot
  • GW = Gathering Wrap
  • RYA = Rya Knot

Top 5 mistakes to avoid

  1. Feather rays bow sideways: uneven DCH spine tension—re-tension hitch by hitch and steam straight
  2. Eye bead faces sideways: Berry Knot rolled before bead was seated—untie, seat facing forward, re-roll
  3. Body looks lumpy: padding shifted during VCH—pack rows upward with a comb every 3 rows
  4. Fan has gaps: sector spacing drifted—slide LHK groups along hoop before hub lash locks them
  5. Spiral tail won't twist: half knots alternating direction—always start from same side for auto-twist