
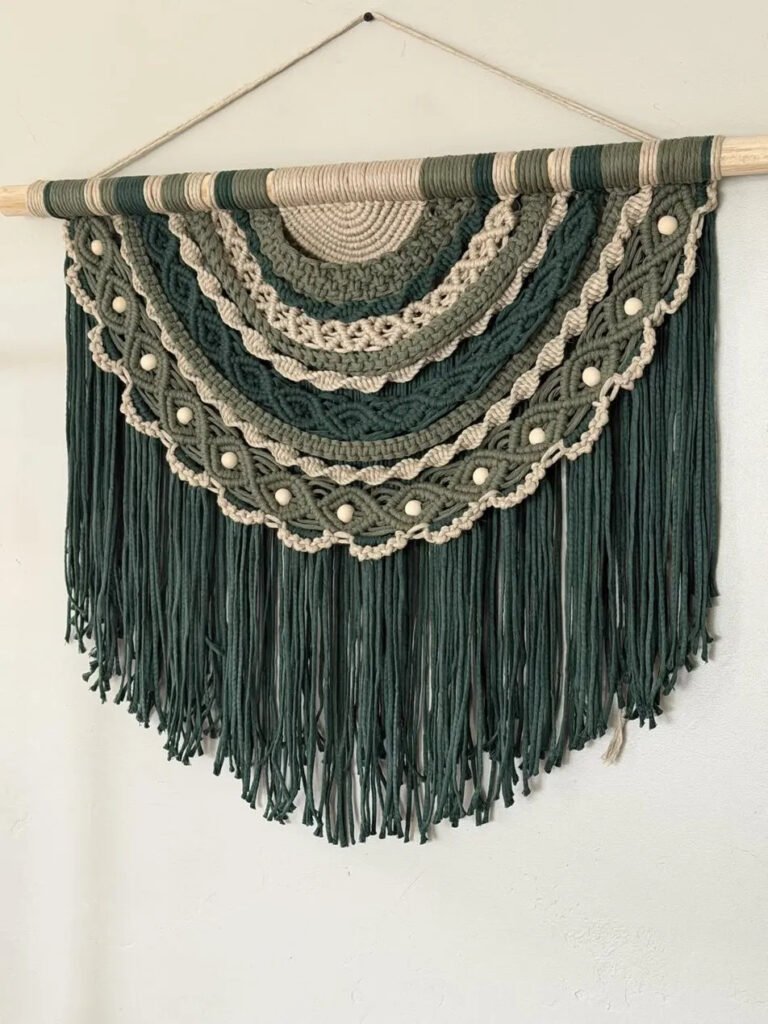
Emerald crescent macramé pattern wall hanging with layered green arcs and fringe

Emerald Crescent

Skill levelAdvancedFinished size30" W x 30" L (76 x 76 cm) on 36" dowelBuild time12-16 hours / 4-5 evening sessions

This emerald crescent macramé pattern brings a dramatic layered arc wall hanging into your home with seven concentric textured bands in forest green, sage, and cream. Whether you’re a seasoned fiber artist or an experienced intermediate ready for a challenge, you’ll love the interplay of wood-bead diamonds, picot lace edging, and cascading fringe that gives this piece its elegant depth.

Emerald Crescent Macramé Pattern: A Showstopping Wall Hanging

The finished piece measures 30 inches wide by 30 inches long on a 36-inch dowel. You’ll build a woven coil medallion, then add arcs of square knots, diagonal hitches, open netting, lattice, and beaded accents. Each band grows outward like tree rings, so the design unfolds naturally as you work. The estimated time to complete this emerald crescent macramé pattern is 12 to 16 hours, or about four to five evening sessions.

Your instant download includes a full illustrated step-by-step PDF with detailed diagrams for every zone, plus a printable quick-reference card showing materials, cord cutting, and knot abbreviations. In addition, you’ll find three deep-dive technique sections that walk you through the coil medallion, shaped arc rows, and bead-diamond construction. Therefore, you’ll have everything you need to succeed, even if it’s your first time working curved leaders or locked-bead diamonds.

Materials & Construction at a Glance

You’ll use approximately 235 yards of deep forest green, 100 yards of sage green, and 160 yards of natural cream 4 mm single-strand cotton cord, along with fourteen 20 mm wooden beads. The pattern calls for lark’s head mounting, diagonal double half hitches, square knots, alternating square knots, and wrapping knots. Because the arcs are worked over curved leaders, pinning your work on a foam board helps maintain clean, even curves. Meanwhile, the fringe layer mounts behind all working cords and is shaped and brushed at the very end for that soft, feathered finish.

Materials at a glance

  • 4 mm cotton cord — deep forest green (~235 yd)
  • 4 mm cotton cord — sage green (~100 yd)
  • 4 mm cotton cord — natural cream (~160 yd)
  • 36" x 3/4" wooden dowel, sanded
  • 14 round wood beads, 20 mm, 6+ mm hole

Build order

  1. Mount & wrap — hanger, fringe layer, all cord groups, wrapped dowel blocks
  2. Z1 — Coil medallion — cream radial half-circle woven at dowel center
  3. Z2 — Square-knot arc — deep green solid SK band hugging the medallion
  4. Z3 — Sage chain arc — vertical DHH chain texture over a curved leader
  5. Z4 — Cream net arc — open ASK diamond mesh band
  6. Z5 — Lattice arc — deep green diagonal DHH cross-lattice
  7. Z6 — Bead diamond arc — sage diamonds with a 20 mm bead locked in each
  8. Z7 — Picot scallop edge — cream lace border with bead accents
  9. Fringe & finishing — shape the V cascade, brush, trim, steam

Cord cutting reference

  • A — 10 × 4 yd (coil medallion spokes, cream)
  • B — 24 × 5.5 yd (arc working cords, deep green)
  • C — 20 × 5 yd (arc working cords, sage)
  • D — 18 × 5 yd (arc working cords, cream)
  • E — 6 × 2.5 yd (arc leader/shaper cords, cream)
  • F — 40 × 2.5 yd (fringe cascade, deep green)
  • G — 4 × 4 yd (dowel wrap + hanger, 1 ea. color +1)

Knot abbreviations

  • LH = Lark's Head
  • SK = Square Knot
  • ASK = Alternating Square Knot
  • DHH = Diagonal Double Half Hitch
  • WK = Wrapping Knot
  • OK = Overhand Knot

Top 5 mistakes to avoid

  1. Leader pulled straight while hitching — re-pin the curve every 6 knots
  2. Coil passes not packed — push each pass up with a comb before the next
  3. Tightening the picot loop with the SK — pin each loop open, snug only the knot below
  4. Bead hole too small for 2 cords — ream or swap the bead, never force it
  5. Cut fringe before hanging — hang 24 h, then trim with the piece on the wall