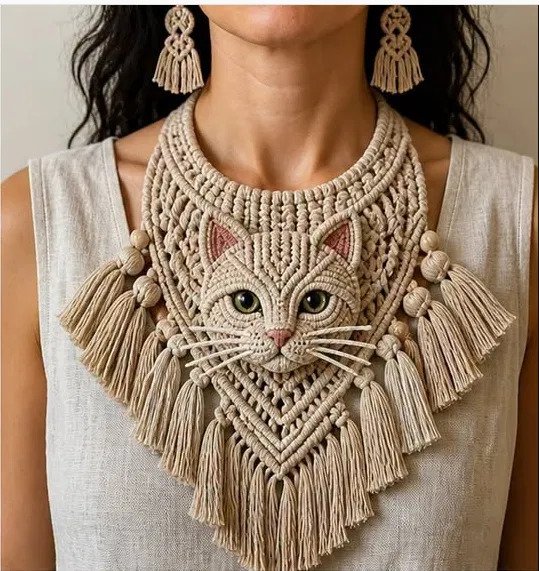
Finished cat face bib collar macramé pattern with woven feline medallion and tassel earrings

Cat Collar

Skill levelAdvancedFinished sizecollar 11 in wide x 13 in long incl. fringe (28 x 33 cm) | earrings 3.5 in (9 cm)Build time16-20 hours / 5-6 evening sessions

This cat face collar macramé pattern transforms cotton cord into a stunning wearable art piece. Perfect for advanced fiber artists who want to push their knotting skills, this bib-style collar features a woven cat medallion, chevron lattice, and matching tassel earrings. Because it combines sculpture with wearability, it’s an eye-catching statement for festivals, photoshoots, or costume design.

Create Your Own Cat Face Collar Macramé Pattern Masterpiece

In addition to the charming feline centerpiece, you’ll master vertical double half hitches, wrapped bead embellishments, and intricate chevron netting. The finished collar measures 11 inches wide by 13 inches long, while the earrings add a coordinated 3.5-inch flourish. Estimated build time is 16–20 hours spread over 5–6 evening sessions, so plan accordingly.

Your download includes a comprehensive illustrated PDF with step-by-step instructions, technique deep-dives for the woven cat face and wrapped spheres, plus a printable quick-reference card. However, beginners should note: this design demands fluency in alternating square knots and precise tension control. Therefore, we recommend tackling a simpler project first if you’re new to macramé.

What You’ll Learn and Love

You’ll work with 2 mm braided cotton in natural sand, dusty rose accents, and waxed whisker cord. Meanwhile, the pattern walks you through nine construction sections—from the curved neckband to the final fringe—with troubleshooting tips for common snags like gapped weaving or uneven diamonds. For example, the embellishment placement map ensures your six wrapped beads sit symmetrically. So grab your T-pins, cord comb, and a cozy workspace: your next fiber-art showpiece awaits.

Materials at a glance

  • 2 mm cotton macramé cord, natural sand (~195 yd)
  • 2 mm cotton cord, dusty rose (4 yd)
  • 1 mm waxed cotton cord, natural (1 yd)
  • Olive-green eye beads (10-12 mm, x2)
  • Brass ear wires (x2) + jump rings
  • 3.5 in cord ring (brass or covered plastic)
  • Sewing thread, sand + tapestry needle
  • Board, T-pins, shears, cord comb, measuring tape, fabric glue

Build order

  1. Neckband collar - foundation cords, LHK mounting, DHH band rows
  2. Yoke panel - dense ASK heart panel worked down from the band
  3. Cat face medallion - woven separately on cord ring, then appliqued
  4. Wrapped bead spheres - six made in hand, stitched to side points
  5. Tassel row - ten perimeter tassels, rya-knotted and wrapped
  6. Chevron lattice - decreasing ASK net to center V, picot edges
  7. Bottom fringe - five graduated V tassels
  8. Earrings - a matched pair on brass wires
  9. Closure & finishing - braided ties, blocking, brushing, sealing

Cord cutting reference

  • A1-A2 — 2 × 60 in (neckline foundation, doubled)
  • B1-B24 — 24 × 90 in (collar/yoke working cords, folded = 48 ends)
  • C1-C10 — 10 × 80 in (lattice extension cords)
  • D1-D14 — 14 × 30 in (face medallion warp)
  • D15-D18 — 4 × 120 in (face medallion weft)
  • E — 210 × 16 in (tassel bundles: 15 tassels × 14 cords)
  • F1 — 36 × 3 in (wrapped bead cores: 6 beads × 6 cords)
  • F2 — 6 × 40 in (wrapped bead wrap cords)
  • G1-G3 — 46 mixed lengths (earrings: 2 holding 12 in, 8 working 30 in, 36 tassel 10 in)
  • H — from 4 yd rose ball (rose accent for ears, nose, neck wraps)

Knot abbreviations

  • LHK = Lark's Head Knot
  • SK = Square Knot
  • ASK = Alternating Square Knot
  • DHH = Horizontal Double Half Hitch
  • VDHH = Vertical Double Half Hitch
  • WK = Wrapping Knot
  • RK = Rya (Tassel) Knot
  • OK = Overhand Knot

Top 5 mistakes to avoid

  1. Neckband ruffles instead of curving flat — pin DHH filler in an arc every row
  2. Face weave shows gaps — beat each VDHH row snug with a tapestry needle as you go
  3. Ears flop forward — run a hidden cord up the back and stitch taut to the frame ring
  4. Wrapped beads egg-shaped — build the belly at center first, then roll between palms
  5. Lattice diamonds uneven — pin a 0.4 in spacer strip under each row before knotting