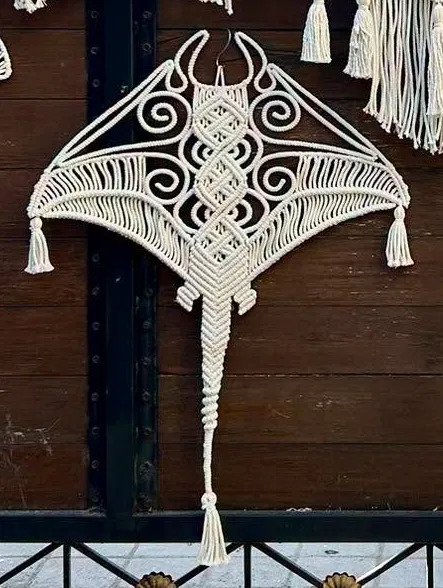
finished manta stingray macramé pattern wall hanging with swept wings and knotted tail

Stingray

Skill levelAdvancedFinished sizeapprox. 24 in wide × 36 in long with tail (61 × 91 cm)Build time16–20 hours / 5–6 evening sessions

This manta stingray macramé pattern is a stunning advanced project that transforms single-strand cotton cord into an ocean-inspired wall sculpture. With its swept wings, diamond body, and knotted tail, this piece captures the graceful silhouette of a gliding ray.

Create Your Own Manta Stingray Macramé Pattern

Unlike traditional dowel-mounted designs, this manta stingray macramé pattern is built over a shaped wire frame that gives the wings their dramatic kite-like sweep. Each edge is carefully wrapped in cord, therefore the frame stays hidden while the wings hold their crisp curves. The body features three stacked clove-hitch diamonds, while the wings are constructed from radiating ray cords that create a delicate filet web. Four stiffened spiral medallions are stitched into the wings as accent details.

This pattern will take approximately 16–20 hours to complete. In addition, your download includes a full illustrated step-by-step PDF with detailed diagrams for every construction phase, plus a quick-reference card showing all knot abbreviations, cord-cutting measurements, and the complete build order at a glance.

Materials and Techniques at a Glance

You will need 3 mm single-strand cotton cord, craft wire for the frame, and basic tools including shears, fabric glue, and a pet slicker brush for finishing the tassels. Because the pattern uses advanced double-half-hitch techniques, comfortable tension control is essential. However, the deep-dive technique sections walk you through the spiral medallions, body lattice, and tapering tail sinnet step by step. The finished piece measures approximately 24 inches wide by 36 inches long with the tail, making it a dramatic focal point for any room.

Materials at a glance

  • 3 mm single-strand cotton cord, natural/ecru — approx. 195 m (215 yd)
  • 3 mm galvanized or aluminium craft wire, approx. 3.5 m (12 ft)
  • 25 mm (1 in) brass or wooden ring
  • Sharp shears, fabric glue, tape measure, wire cutters & pliers
  • Pet slicker brush, sewing needle and ecru thread

Build order

  1. Bend and wrap the frame (outline, horns, head bar, hanging loop)
  2. Body diamond lattice (mount B cords, work three stacked DDHH diamonds with SK fill)
  3. Wing ray cords (mount C cords, work DDHH rays from body out to frame, both wings)
  4. Spiral medallions (coil, stitch and mount four spirals into wing filet)
  5. Pelvic fins (two small DDHH fans at body base)
  6. Tail (lash bundle, work tapering sinnet with three barrel bumps, tassel the end)
  7. Tassels & finishing (four wing tassels, brush, trim, block wings)

Cord cutting reference

  • A — 4 × 5.0 m / 16.5 ft (Frame wrapping)
  • B — 12 × 3.5 m / 11.5 ft (Body lattice cords)
  • C — 24 × 2.5 m / 8.2 ft (Wing ray cords)
  • D — 8 × 2.0 m / 6.6 ft (Spiral coil cords)
  • E — 4 × 1.8 m / 6 ft (Tail core cords)
  • F — 6 × 3.0 m / 10 ft (Tail working cords)
  • G — 48 × 40 cm / 16 in (Wing tassels)
  • H — 16 × 45 cm / 18 in (Tail tassel strands)
  • I — 6 × 1.2 m / 4 ft (Pelvic fin cords)

Knot abbreviations

  • LH = Lark's Head
  • SK = Square Knot
  • DDHH = Diagonal Double Half Hitch
  • VDHH = Vertical Double Half Hitch
  • WK = Wrapping Knot
  • BK = Barrel Knot
  • OK = Overhand Knot
  • SC = Wrapped Spiral Coil

Top 5 mistakes to avoid

  1. Wings cup or twist — ray tension uneven side to side; re-tension last rays, steam and pin flat
  2. Diamonds look lopsided — filler cord angle drifted; pin filler at 45° before hitching each row
  3. Frame wrap shows gaps — wraps not compacted; push wraps together every 10 turns
  4. Spirals spring open — coil not stitched through all rounds; re-stiffen with glue, stitch at 4 points
  5. Tail curls sideways — SK sinnet not alternated; swap leading cord every 5 knots to balance twist