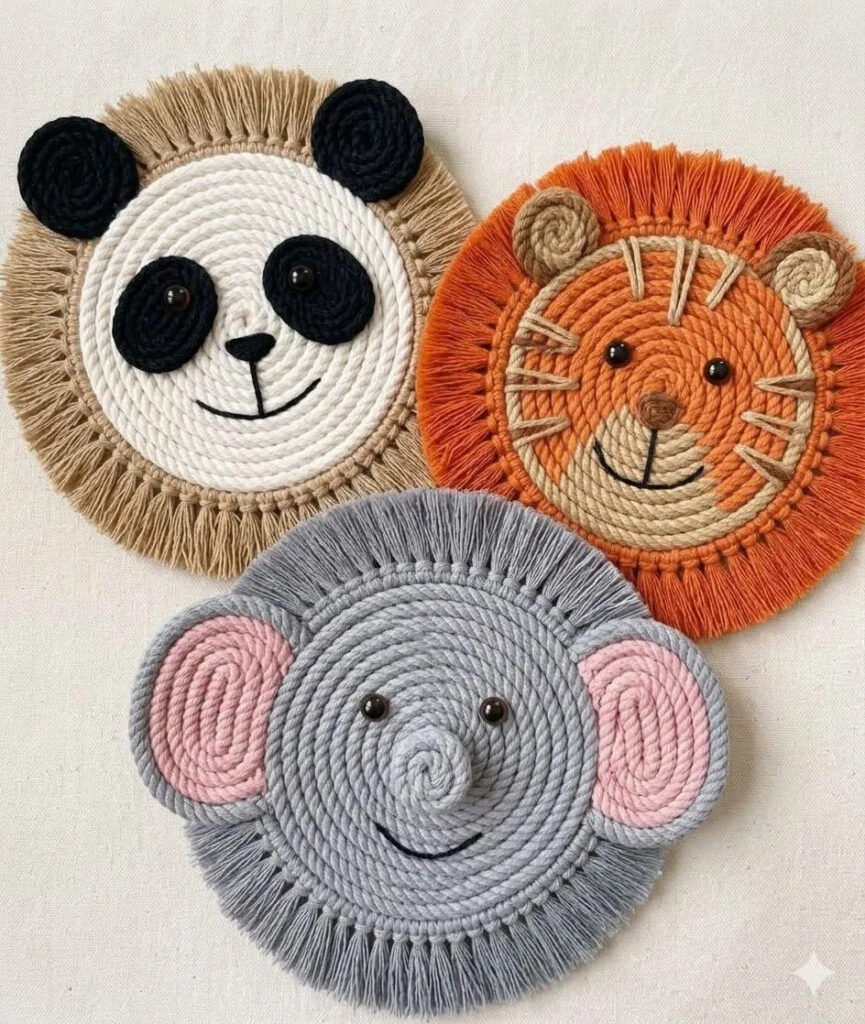
Three finished animal coaster macramé pattern pieces: panda, lion, and elephant with fringe halos

Animal Coasters

Skill levelBeginnerFinished size6.5–7 in (16–18 cm) eachBuild time6–9 hours / 2–3 evening sessions (full trio); per coaster: 2–3 hours

The animal coaster macramé pattern transforms simple coiled rope and knotted fringe into three adorable faces—panda, lion, and elephant—each about 7 inches across. Perfect for beginners who love quick, charming projects, this trio teaches you a single coil-and-fringe system that works for all three designs. You can craft one whimsical coaster in an evening or dedicate a weekend to the full set.

How the Animal Coaster Macramé Pattern Works

Each coaster starts with a spiral-coil center, built outward in concentric rings. Then you edge the disc with Lark’s Head knots in matching 3 mm fringe, brush the strands fluffy, and trim for a neat halo. After that, you personalize: glue on ear coils, add safety eyes or beads, and embroider a simple smile. Because every step is beginner-friendly, even absolute newcomers finish with polished, giftable results.

The estimated build time for the full trio is 6–9 hours, or 2–3 relaxed evening sessions. Therefore, you can easily pace the work to fit your schedule. In addition, the download includes a comprehensive illustrated PDF that walks you through coil tension, fringe brushing, and feature placement, plus a handy quick-reference card summarizing cord cuts and assembly order at a glance.

Materials and Customization

You will need single-twist 5 mm cotton rope in cream, black, terracotta, tan, gray, and dusty pink—about 40 yards total—plus matching 3 mm fringe string. Safety eyes, embroidery cord, a low-temp glue gun, and optional felt backing round out the kit. However, every element is swappable: substitute colors for other animals, scale up the pattern for wall hangings, or skip safety eyes in favor of embroidered ones for actual coaster use. With clear troubleshooting tips and six technique diagrams, this pattern ensures your animal faces turn out flat, fluffy, and full of personality.

Materials at a glance

  • Cotton rope 5 mm — cream, black, terracotta, tan, gray, dusty pink (~40 yd total)
  • Cotton string 3 mm for fringe (~30 yd total)
  • Safety eyes 10–12 mm (6 total, 2 per coaster)
  • Embroidery cord 2 mm black + tan (3 yd)
  • Hot glue gun + sticks (low-temp recommended)
  • Tapestry needle & pet comb
  • Felt backing optional (5 in circles, 3 total)

Build order

  1. Coil the face disc (SC start, GC rounds to 4.5–5 in)
  2. Attach fringe halo (LH knot 55–60 pieces around rim)
  3. Brush & trim the halo (comb fluffy, trim to 1 in border)
  4. Coil ears and feature pieces (cords C, D)
  5. Set safety eyes (between rings 2–3)
  6. Embroider face (SS smiles, noses, whiskers)
  7. Assemble & finish (glue ears, back with felt)

Cord cutting reference

  • A — 1 × 3.0 yd × 5 mm (face coil outer rings)
  • B — 1 × 2.0 yd × 5 mm (center rings 1–4)
  • C — 2 × 1.0 yd × 5 mm (ear coils)
  • D — 2 × 0.75 yd × 5 mm (feature coils: patches/inner ears/nose)
  • E — 60 × 6 in × 3 mm (fringe halo)
  • F — 1 × 24 in × 2 mm (embroidery cord)

Knot abbreviations

  • SC = Spiral Coil Start
  • GC = Glue-and-Coil
  • LH = Lark's Head (fringe)
  • OK = Overhand Knot
  • SS = Straight Stitch
  • WS = Whip Stitch (optional join)

Top 5 mistakes to avoid

  1. Winding coil rounds too tight, causing the disc to cup into a bowl
  2. Using too few fringe knots or under-brushing, resulting in a thin halo
  3. Trying to pierce rope with safety-eye posts instead of pushing between rings
  4. Blunt-cutting color-change ends instead of taper-cutting at 45° for a hidden joint
  5. Placing features by eye instead of using the placement map, leading to lopsided faces