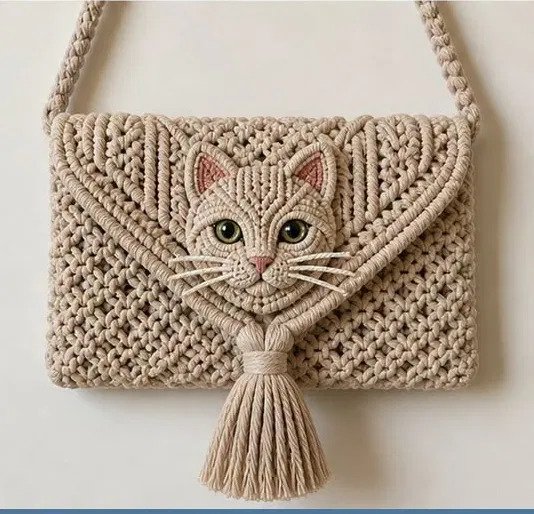
Finished cat purse macramé pattern with tassel and strap

Cat Purse

Skill levelIntermediateFinished sizePurse 10 x 6.5 in (25 x 16 cm) - strap 40 in (102 cm)Build time10-13 hours for a beginner-to-intermediate crafter / 3-4 evening sessions

This cat purse macramé pattern brings together textured knotwork and whimsical design in a single, functional piece. Whether you’re a feline lover or simply enjoy statement accessories, The Whiskered Clutch offers a charming project that stands out. It’s perfect for intermediate makers ready to expand their skills with decorative stitching, sculptural details, and layered construction.

Create Your Own Cat Purse Macramé Pattern in Just a Few Sessions

The finished bag measures 10 × 6.5 inches with a 40-inch adjustable strap. Expect to spend around 10–13 hours total, which easily breaks into 3–4 relaxed evenings. Because of this manageable timeline, you can complete it over a long weekend or work steadily through a week.

You’ll combine alternating square-knot mesh for the body, diagonal double-half-hitch chevrons for the flap, and a separately knotted cat-face medallion that becomes the centerpiece. Meanwhile, the pattern includes detailed illustrations for the wrapped tassel, ear triangles, and waxed-cotton whiskers—so every element is clear. In addition, your download comes with a full step-by-step PDF plus a handy quick-reference card you can print and keep on your work table.

Who Will Love This Pattern?

If you’ve mastered basic square knots and half hitches, you’re ready. However, the medallion does require patience and consistent tension, so fresh eyes help. The pattern suits anyone who wants a unique clutch for festivals, brunches, or gifting. Moreover, the optional fabric lining makes it sturdy enough for daily use.

Materials at a glance

  • 3 mm single-twist cotton, warm sand — approx. 88 yd
  • 2 mm cotton, dusty rose (nose/inner ear) — 2 yd
  • 2 mm cotton or embroidery, olive green (eyes) — 2 yd
  • 1 mm waxed cotton, natural white (whiskers) — 1.5 yd
  • Cotton fabric lining 11 × 14 in (optional)
  • Cork/foam board, T-pins, tapestry needle, shears, fabric comb, measuring tape

Build order

  1. Cut all cords; mount groups A + B onto holding cord
  2. Knot back panel — 6 in ASK mesh
  3. Continue front panel — 6 in more ASK mesh
  4. Work flap — 6-7 DDHH chevrons tapering to point
  5. Off-board: knot cat face medallion (3.5 in disc)
  6. Add ears, nose, eyes, and whiskers to medallion
  7. Stitch medallion to flap center
  8. Tassel closure at flap point (wrapped knot)
  9. Strap — HSK spiral 40 in; lash to side seams
  10. Fold at 6 in line, seam sides, optional lining, final trim & steam

Cord cutting reference

  • H — 1 × 60 in (holding cord for top edge + side seams)
  • A — 20 × 110 in (body mesh cords, fold to mount)
  • B — 12 × 120 in (flap/center cords, fold to mount)
  • C — 9 × 30 in (face medallion carrier + fillers)
  • D — 14 × 12 in (tassel skirt cords)
  • E — 4 × 150 in (strap cords, HSK spiral)
  • W — 3 × 24 in (wrapping cords for tassel + strap ends)

Knot abbreviations

  • LHK = Lark's Head Knot
  • SK = Square Knot
  • HSK = Half Square Knot
  • ASK = Alternating Square Knot
  • HH = Half Hitch
  • DDHH = Diagonal Double Half Hitch
  • WK = Wrapped Knot
  • OK = Overhand Knot

Top 5 mistakes to avoid

  1. Inconsistent gap between ASK rows causes uneven diamonds — pin a 1/4 in spacer
  2. Pulling SK working cords too hard narrows the panel — loosen grip, measure every inch
  3. Carrier cord not pinned at fixed angle makes chevrons wander — pin start and end points
  4. Face disc rounds too tight create a cupped bowl — ease tension, block flat while damp
  5. Eyes placed by eye look crooked — pin both positions, view at arm's length first