
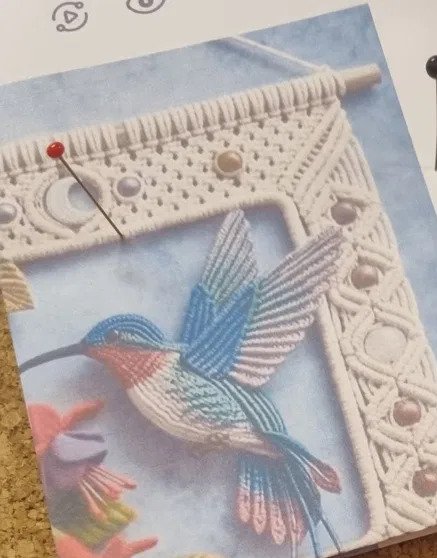
Delicate hummingbird macramé pattern in steel blue and dusty rose with picot-edge feathers

Hummingbird

Skill levelAdvancedFinished size≈ 6½ × 8 in (16.5 × 20 cm)Build time10–14 hours / 4–5 evening sessions

This hummingbird macramé pattern brings an exquisite micro-macramé sculptural bird to life in stunning detail. Perfect for advanced fiber artists who crave a creative challenge, this pattern transforms 1 mm waxed polyester cord in steel blue, dusty rose, and plum into a breathtaking piece measuring approximately 6½ × 8 inches.

Create Your Own Hummingbird Macramé Pattern Masterpiece

The design features intricate picot-edge feathers, vertical double half hitch colour-change work, and delicate open lattice wing tips. Because the construction requires precision knotwork and careful tension control, this pattern suits experienced makers ready to expand their skills. You’ll complete this micro-macramé bird in an estimated 10–14 hours across 4–5 relaxed evening sessions.

Your instant download includes a comprehensive illustrated PDF with detailed step-by-step instructions, full-size diagrams for every technique, a complete cord cutting chart, and three deep-dive tutorials. In addition, you’ll receive a printable quick-reference card showing the assembly map and knot abbreviations at a glance.

Display Options and Versatility

Mount your finished hummingbird on a display hoop, frame it as fiber art, or add a brooch pin to wear it as wearable sculpture. Meanwhile, the pattern guides you through mounting the spine, shaping the head and breast, building layered wing feathers, and creating an airy tail with flowing fringe. Therefore, you’ll master advanced techniques including VDHH colour transitions and diagonal double half hitch feather construction that you can apply to future projects.

Materials at a glance

  • 1 mm waxed polyester cord — steel blue (≈ 38 yd)
  • 1 mm waxed polyester cord — dusty rose (≈ 16 yd)
  • 1 mm waxed polyester cord — plum/violet accent (≈ 5 yd)
  • 4 mm black glass bead (eye)
  • Cork or macramé board + T-pins
  • Sharp snips, tapestry needle, lighter/Fray-Chek, steamer or iron

Build order

  1. Mount the spine — Pin group A; mount F, B, C, D, E along it
  2. Beak & head — Wrap beak with F; pack DHH rows; set eye bead
  3. Breast & body — Paint rose breast in VDHH; shape belly line
  4. Upper wing — Build 5 picot-edge feathers from group D
  5. Lower wing — Build 4 shorter feathers; layer behind upper wing
  6. Lattice tips & tail — Open mesh at wing tips; work 3 tail feathers
  7. Finishing — Block, steam, trim, seal ends; stitch layers; mount

Cord cutting reference

  • A — 2 × 60 in (spine / holding cords, steel blue)
  • B — 7 × 40 in (head & upper body, steel blue)
  • C — 5 × 40 in (breast working cords, dusty rose)
  • C1 — 2 × 70 in (VDHH breast painter, dusty rose)
  • D — 12 × 36 in (wing feathers, steel blue)
  • D1 — 3 × 36 in (feather accent stripes, plum/violet)
  • E — 6 × 45 in (tail feathers + fringe, rose & blue mix)
  • F — 1 × 24 in (beak & shaft wrapping cord, steel blue)

Knot abbreviations

  • RLHK = Reverse Lark's Head
  • DHH = Double Half Hitch
  • DDHH = Diagonal Double Half Hitch
  • VDHH = Vertical Double Half Hitch
  • PICOT = Picot Edge
  • WK = Wrapping Knot
  • OK = Overhand Knot

Top 5 mistakes to avoid

  1. Feather edges wave — DDHH filler held too loose; pull shaft leg taut BEFORE each hitch
  2. Head cap looks lumpy — rows not packed; push each row up with a pin
  3. Rose bleeds past colour line — C1 carried across front; always pass rose to BACK at stop warp
  4. Picots disappear — loops pulled out; pin each picot as you form it, roll proud before steaming
  5. Lattice mesh collapses — crossings locked too tight; keep 5 mm of air above each crossing